
Quick Poll HAVE YOU EVER SHOPPED AT BOOTH#555?
07 Apr 2015 Leave a comment
in booth 555, booth555, morehead peddlers mall, peddlers mall
OLD SIMPLIFY PRIMITIVE TRUNK
31 Mar 2015 2 Comments
in booth555, metal trunk, morehead peddlers mall, old trunk, peddlers mall, primitive, Primitive Trunk, simplify

Here is a cute $5.00 trunk that I won at an auction.
It was a rusty brown color with bits of black here and there before.
I did remember to snap a before pic this time!
But only after I finished spray painting it entirely black!
Here’s a pic of it, but from the back.

Well, I knew I could do something cute with it.
So I decided to just make it a little primish.
I had a large “SIMPLIFY” stencil that I got off from eBay that I had been dieing to use.
So I got that out along with some star stencils.
And this is what it ended up like:


And here is another one that started out just like the first one.
It’s just a little bit bigger.
But I forgot the before pics, or either I can’t find them one.
I took a can of wine colored spray paint and kind of sprayed here and there around the edges to give it a little more interesting color.


And off to my Peddlers Mall Booth #555 it went:
I priced it for $29.99
I priced it for $29.99


Sold in my Booth#555
THANK YOU
Easy Epson Salt Snowballs
07 Oct 2014 4 Comments
in booth555, crafts to make and sell, dollar store crafts, epson salt snowballs, fake snowballs, how to make snowballs, morehead peddlers mall, peddlers mall, snowballs, Snowballs with Epson salt

Look how cute these little snowballs turned out that I made with simply epson salt and Elmer’s glue! Aren’t they adorable. And they are super easy to.
Here’s a link to a recent post I did titled: Craft Ideas for Styrofoam Balls found here:
http://www.bubblews.com/news/1796171-craft-ideas-for-styrofoam-balls
It seriously is one of the easiest crafts I’ve done. Here’s how I did it.


1. Gather some styrofoam balls (look at Walmart in the craft section,) Elmer’s glue and a box of epson salt.
2. Pour out the epson salt in a pie pan or something similar. I use those throw away aluminum pie pans for easy clean up.
3. Take the Elmer’s glue and paint it all around the styrofoam ball with a good coating.
4. Then, while still wet, roll it all around in the epson salt. Make sure to get a good coat on. And don’t worry if you don’t think you are getting enough on. You can always go back and add more easily.
And that is it. Set it aside on some wax paper to dry! From time to time you do notice some epson salt breaking off, but it would be an easy fix by just applying a clear coating. But I have just left mine how they are. I love how the lights sparkle off the salt!
I found an old minnow, rusty bucket with a handle that I sat my fake snowballs in to display. I added a metal brown star and put the words “Snowballs 5cents” on it with white craft paint. And to finish it off a sprig of pip berry and some homespun fabric.
These are a hot seller in my Peddlers Mall Booth #555. When in a bucket like this, I price them for only $7.99. But when I put them in a bag in sets of 3, I only put $2.99 on them.
Article by &jelliedkey
Photo by &jelliedkey
PRIMITIVE SNOWMAN MAGNETS CABOCHON
05 Sep 2014 2 Comments
in booth555, crafts to make and sell, dollar store crafts, morehead peddlers mall, peddlers mall, primitive snowman, snowman, snowman faces, snowman magnets, snowman pin
(Warning Lots of Snowmen Photos!)
I made these Primitive Snowman Magnets:

out from these $1.19 party favor button pins:

The party favor buttons can be found at the Dollar Mart for only $1.19 for a pack of 12. Wow!
Just take them apart by pressing them open, the pins on the back twist off with a setting and here they are all apart:

The little plastic cabochon tops tops are usually that price for only them!

And I just began by painting the backs of the Jesus inserts. I did not want to paint over the Jesus picture, lol, I’m just like that.

Then after painting about 24 of these all in antique white, I started to add some eyes:

And then I started to just free hand on some noses and then some mouths on some:

Some of them I took some very very light reddish pink and gave their cheeks some rosey, winter color.

And then I took some magnets, also found in the Dollar Mart, for a $1.19 for a pack of 20! Unbelievable! I bought all they had! And I glued them on the back with my favorite glue ever, E6000. It is found at Wal-Mart.

And then on the fronts I took some tears of homespun fabric, tied little knots in them, and glued them on with E6000 glue also, as little scarves.

And here is a set of them sitting and drying.

They are starting to look super cute!
(adsbygoogle = window.adsbygoogle || []).push({});

After they dried, I tried the magnets out on a metal lid. They hold great!
And then I figured on some (not assembled yet) I would go back add some glitter to the faces. To give the feel of maybe frost. I did this with simple craft varnish mixed with a dash of silver glitter. White glitter would have been better, but I was out of the great, tiny stuff:

And here is some with the glitter varnish and some easy print out 3×5 papers from Avery.com to make them look better in the packages:


Some of them I decided to put the Pins back on the back to mix them up.
Who knows, they may be a cute winter pin to wear!
And the others, I left as magnets. Magnets are my all time favorite thing to make with snowmen!

If you like the Snowman Spoons in the pitcher above, here’s where I made them!


I priced these for only .99cents each in my Peddlers Mall Booth #555
I think they will be a great grab as you go item that people can keep or give as a cheap gift.
(adsbygoogle = window.adsbygoogle || []).push({});
Barn Lumber Display Rack
21 May 2014 2 Comments
in barn lumber, barn lumber display, barn lumber ideas, booth 555, country, display rack, magazine caddy, magazine rack, morehead peddlers mall, peddlers mall, primitive

I needed something old and country themed to display my Country Sampler magazines in at my Booth #555 at the Peddlers Mall.
I asked my husband to fix me up something and this is what he came in with. He took some short pieces of some aged barn lumber we had, and simply cut and pieced them together. In a type of form that he thought would house magazines. And, in my opinion he done great!
After taking the photo, I sanded it down with some sheets of coarse sand paper and then sealed it with some craft sealer. I didn’t want anyone to get splinters while reaching for the magazines.
I wish I’d taken a photo of it finished. If I did, I can’t find it yet…..
And by the way, after being in my craft booth as a display item only, I had calls from the store that people wanted to purchase this. So I priced it for only $9.99 and my husband is now making me some more. Both to keep and use and to sell.
RED and WHITE Speckled COUNTRY EGGS
22 Mar 2014 3 Comments
in booth 555, crafts to make and sell, Easter Egg Ideas, easter eggs, eggs, enamelware, graniteware, kitchen, kitchen crafts, morehead peddlers mall, peddlers mall, red and white, speckled eggs

Today I thought I’d share how I make my Red and White Speckled “Graniteware/ Enamelware” Looking Country Eggs. I do both the white based with red specks and also the red base with white specks. I love them both!
I was thinking that some people may want to make these for display with Easter right around the corner. But as for me, I keep mine out all year long. They look awesome with the red and white speckled “graniteware/enamelware” themed other items I have in the kitchen also.
First, I start off with some basic, crafting plastic eggs. You can find these at Michaels or sometimes you get lucky and run across a bag of them at the Dollar Mart! These are not the type that you can pull apart, they are full eggs, in one piece. They are plastic and hollow inside.

I was lucky enough to find these in huge bags of 40 for only $1.19 at the Dollar Mart last year. My buggy and arms were full! And please note that I did buy them all except for one bag. Which I left in case someone really needed them. lol. Some of mine in the tote are dented due to being stored at the bottom of a huge stack in the garage. lol. But I am still going to use them.
The next step is to simply spray paint them with a base coat. I use the $3.00 red from the Dollar Store and the $1.50 white. The little bit higher red tends to cover better than the dollar kind. Do not try to paint them on something like a plastic bag. They will stick and get lines….I tried.

The best thing I found to paint them in was a cardboard box lid. The gift box type. Once painted they can even roll around and it will not mess up the paint too much. I do a box full of both white and red as the base.
Then let them dry a bit, roll them around and spray the other sides. Then just let it all dry again.
Now comes the toughest part….but don’t worry, it’s still not hard. It’s the time to add the “speckled look.” And getting it just right is not necessary. But here’s a trick. Practice over something like an empty box until you get the hang of it. I just barely…..and I mean BARELY press down on the spray button on the spray paint to just make it kind of “spit” the paint out in little specks. And I hold it over top the eggs. Probably about 2 foot or so above. That way you will get the little dripping effects.


You can see some of the big drips that also fell in the box. It hit a few eggs to, but even they still looked kinda cool in the end.
I forgot to take a pic of the red based ones with white specks, but they are just the same as above, but vice versa colors.
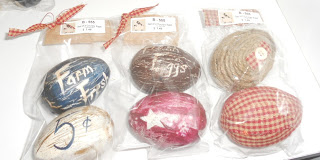
And here’s how I package them up to sell them in my Peddlers Mall Booth #555:

I put them in these clear bags and just add a label and sometimes a string of homespun to make them look super country. I do sets of 2 for only $1.59 or sets of 4 for $2.79. The sets of 2 go faster than the sets of four, I am guessing because of the $1.59 price. And that people may add them to their own groups of eggs they already have.
Here’s a few more pics of them packaged and ready to go:


And here’s how I display some in my own kitchen. They are all nestled inside of a wire chicken frame that I found at a yard sale for only $2.00.

I need to go back and add a touch of that fake nesting grass under the eggs. Ah, I’ll get to it one day.
Well, I hope this gives you some ideas on what to do with those plastic craft eggs you may have laying around. I’m pretty sure this will also work on those left over Easter eggs as well. They’d just have the seam in the middle is all.
MORE IDEAS:
And if you are looking for a more primitive, country theme to do on plastic eggs, check out my recent post here: PRIMITIVE “COUNTRY THEMED” EGGS.
CRAFT BOOTH MAKEOVER FAIL
13 Feb 2014 4 Comments
in booth 555, change, country, gray and pink, morehead peddlers mall, peddlers mall, pink room themes, pink rooms, pink themes, primitive

Welcome ya’ll! This is my 100th blog post! Awesome! Thanks for sharing this exciting moment with me!
Well, It’s official…. I am already hating my new booth theme of the pink/gray I chose last month for my craft booth at the Peddlers Mall.
If you missed that post, here’s a snapshot of how it originally was (the way I loved but got tired of):

and here’s how I changed it up last month:

And I am already hating it…. The colors are really pretty together, don’t get me wrong. I love the gray/pink/white combo but I just miss my primitive theme super bad.
So at the end of this week, I am repainting it and going back to the primitive theme that I love!
I am going to choose a dark red and white theme. And have lots of gingham check patterns, hopefully. I will also add back the grapevine and wood furniture. I am leaving out a fireplace, for a while. At least until the end of summer, for now.
At least I went ahead and gave a major change a try. I just didn’t like it. But one good thing came out of this for sure. I am super ready to start making more and more primitive crafts to share here! I have to, to get ready to fill up my booth with them next week.
So watch for primitive posts coming soon!!!!! And a super big thanks to all ya’ll that still follow and read my blog here! This post was my 100th blog entry. And the pages before this are filled with primitive crafting ideas. So please be sure to click back through them, if you haven’t already and find some inspiration! And if you have a great idea, please send them to me. I love hearing about all the new stuff out there in the primitive themes!
Happy Crafting Ya’ll!!!!
Primitive Tobacco Stick Grapevine Tree
21 Oct 2013 2 Comments
in craft booth ideas, craft fair, craft night, crafts to make and sell, grapevine, grapevine tree, ky, peddlers mall, pip berry garland, tobacco stick, tobacco stick tree, tobacco stick uses, tobacco sticks
I recently posted about how to make a Tobacco Stick Tree out of old tobacco sticks. Well, today I’m going to share with you the process of how I take this a step further by adding grapevine. And turning those old, unwanted tobacco sticks into a cute Tobacco Stick Grapevine Tree.

Since making this very first one, like this, I’ve made many more with a few different options now. I prefer the skinnier ones like this:

And here it is when I was just toying with some grapevine on it:

And I started to like it. So I added a few more strands to fill it in. And it started to look like this:


Then I had to add even more grapevine to hid the legs, which I was planning on leaving showing, but it looked weird. And I also started to tie in some sprigs of pip berry garland to add more interest, like this:

The grapevine garland comes in rolls and looks like this when unrolled:


I didn’t want to overload it with the grapevine garland so much that it would hide the tobacco sticks. I think they look kinda cute showing through. Here it is all done with everything except the lights.

And my latest one is now a tabletop version for those spots where we just don’t have enough room for the full size. Here is the beginning of my very first ever, tabletop tobacco stick tree without any decorations so you can see the basic frame:

And here is the same one, tabletop version with a bit of grapevine garland just strung on. So you start to get the picture:

I’m still working on this one, 🙂 But here’s a few below that I have recently finished and sold:
This one with yellow pip berries was a trial and error. I took sprigs of pip berries and put them on one by one instead of stringing the strands of garland.

I didn’t want to hide all the tobacco sticks.


And here’s another shorter, tabletop kind with grapevine, star lights and pip berries:

The big star is on the wall, not on the tree. lol.
I made these to sell in my Peddlers Mall Booth #555, and have recently been making other items such as:
Primitive Crafts:
Tobacco Stick Chair

Americana Tobacco Stick Flag

Primitive Barnwood Tool Box

Happy Crafting Ya’ll!
Primitive Bench
09 Oct 2013 Leave a comment
in booth 555, craft fair, craft ideas, craft night, crafts, crafts to make and sell, faith, FAITH FAMILY FRIENDS, peddlers mall, piano bench, primitive, primitive bench
Here’s the latest addition to my items for sale in my Booth #555 at the Peddlers Mall. It’s a piano bench that I redid into the primitive theme.

And here it was before the makeover:


I first I tried to leave it in the off whiteish/light brown base with sage stars and red writing, and then I hated it!


Next, I painted it all over again in the black and loved it. Especially after I took sand paper and scruffed up all the edges to make it a little worn looking.
And here it is again, the second time I tried, lol. And definitely the best of the two.

Don’t forget to like my Booth #555 on Facebook for the latest items!
 And here’s a few other things that I’m working on and will be putting in my booth this week, if’ you’d like to take a look:

If you’d like to see another one of my piano bench remakes, here’s the link:
Old Piano Bench Repurposed

Happy Crafting Ya’ll!
Primitive Button Jars
27 Jul 2013 Leave a comment
in button collector, button jars, buttons, country, craft booth ideas, crafts to make and sell, crafts with buttons, morehead peddlers mall, peddlers mall, prim, primitive, stars
I buy clear glass salt and pepper jars all throughout the year. And well, any jar about that size with a lid. I even buy some larger jars from time to time to just hold my lose buttons until I need them. Like the large canning, glass jar in the back, right side of the pic below.

Sometime around fall, I start making my button jars to sale in my Booth #555 at the Peddlers Mall. I’m not sure why I wait till then, but it just seems to happen each year. Or maybe because it’s right after yard sale season around here, and I’ve had time to collect a bunch.
And sometimes I even find them super cheap, marked down to fifty cents per set. And I’ll grab a few. But they usually have the bright shiny stainless looking caps. And for that I add some Delta Stencil Paint with a sponge. It sets up good after a few days and doesn’t tend to rub off. Looks like this after it’s on, (but not dry yet.)

These are not great money makers, but they are steady sellers. And they offer an inexpensive item for your booth that anyone walking by would be able to afford. Most of these, unless they are older more hard to find jars, I try to keep them priced at only a $1.99 each. And when I’ve rounded up the salt and pepper shakers from yard sales all summer, usually along with tons of buttons from auctions and estate sales, I only have a few pennies and time in each.
Here’s some more I had just painted:

And here’s one of my favorite old rusty topped ones. The top was originally rusty, so I just had to add a pale yellow star and some homespun, along with the buttons.

As you see, there’s nothing hard at all about making these cute empty jars into button holders. They are a great item to just “tuck” into that spot where nothing else seems to look right. And they’d look awesome sitting beside an old sewing machine with items such as bobbins and pin holders and maybe a hand sewn doll!
Happy Crafting Ya’ll!
